
TL;DR
A closet can become a surprisingly good vocal booth when you manage reflection, sound leaks, and heat. Proper placement and ventilation are key, not just foam. The best setups blend noise control with airflow, especially for continuous-use rigs.
Ever wondered why some closet setups sound surprisingly good, while others turn into muddy echo chambers? The secret isn’t just in the foam or blankets. It’s about where you place your treatment, how you handle sound reflection, and ensuring your rig stays cool. If you’re considering turning a closet into a mini studio or a quiet work zone, this guide walks you through the real-world moves that make all the difference. You might also find this guide on acoustic dampening, placement, and the ‘Rig in the Closet’ setup helpful. No fluff, just proven tips to make your small space work for your voice, streaming, or AI rig.
By the end, you’ll see that the right placement, ventilation, and reflection control can turn a tiny closet into a high-quality, quiet zone — without breaking the bank or sacrificing your comfort.
Acoustic dampening
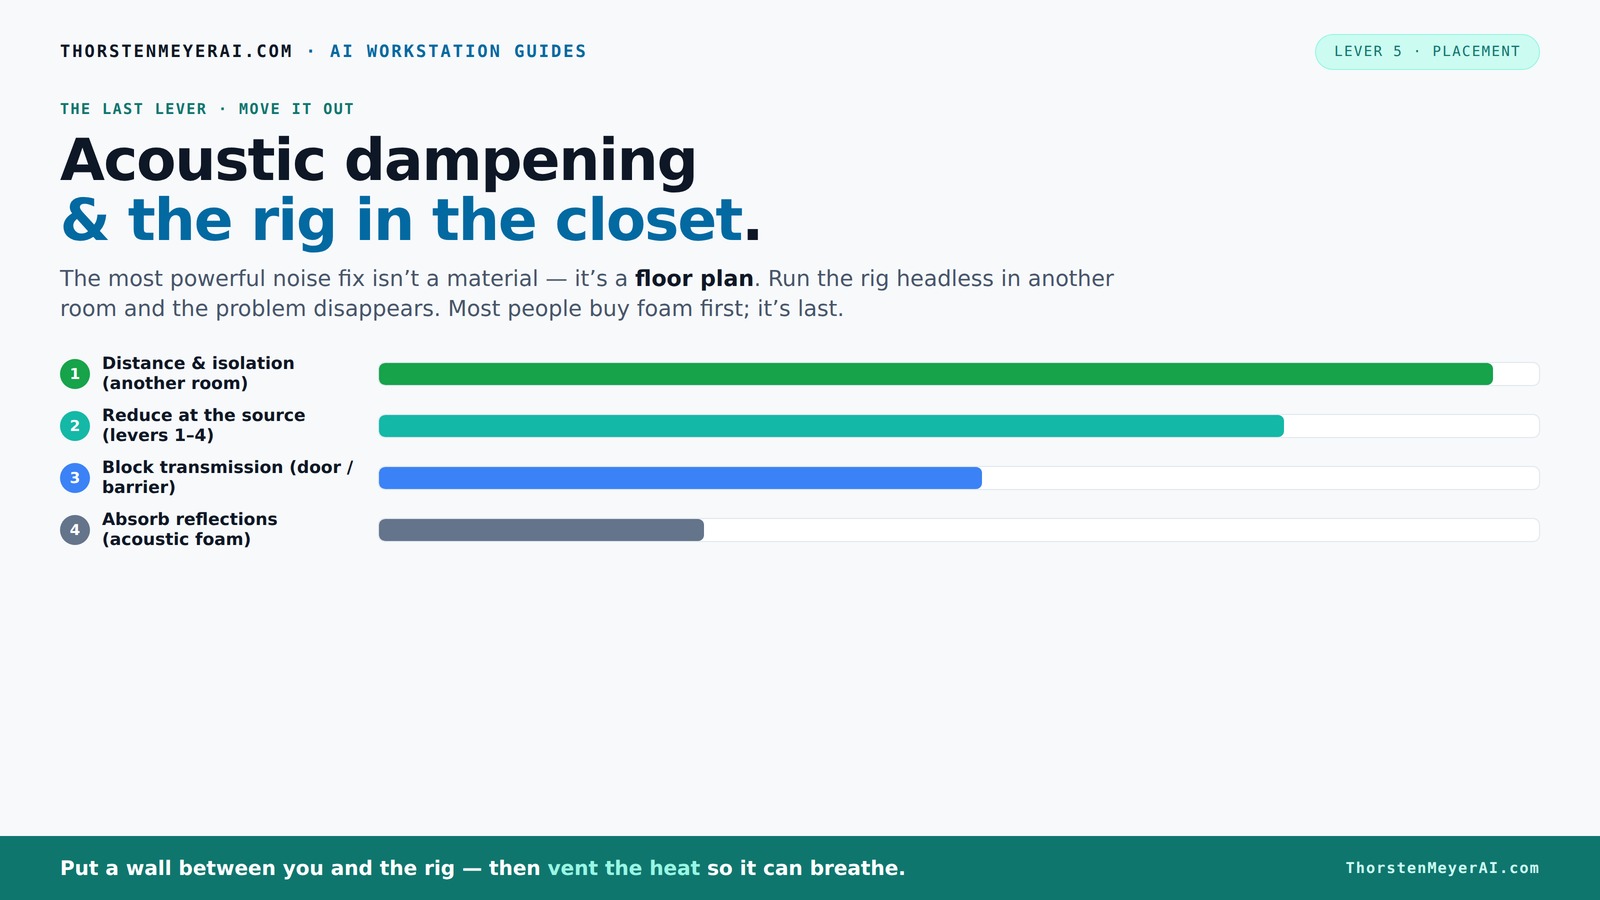
& the rig in the closet.
The most powerful noise fix isn’t a material — it’s a floor plan. A rig you can’t hear because it’s in another room beats any amount of foam. Tap the approaches in Part 1 to see what actually works.
(another room)
(levers 1–4)
(door / barrier)
(acoustic foam)
Contain the noise, not the heat
Key Takeaways
- Prioritize reflection control and sealing gaps before adding foam or blankets.
- Treat the main reflection points: behind the mic, side walls, and ceiling.
- Always ventilate your closet to prevent heat buildup; use ducting or quiet exhaust fans.
- Sealed, ventilated closets can turn into excellent recording spaces — if you manage airflow.
- Low-end buildup is common; use bass traps and heavy absorption in corners for balance.
soundproofing foam panels for home studio
As an affiliate, we earn on qualifying purchases.
As an affiliate, we earn on qualifying purchases.
Why Reflection Control Trumps Foam in Small Spaces
In a tiny closet, the biggest challenge isn’t just outside noise — it’s the echo bouncing off hard surfaces. Acoustic foam can soften reflections, but it doesn’t block sound from escaping or entering. Think of foam as softening a echo in a canyon, not stopping a train from rolling by. To truly quiet a closet, you need to address the hard surfaces that cause harsh reflections and flutter echoes.
For example, placing foam on the wall behind your mic and on the ceiling cuts down on harsh reverb, making your voice clearer. But if your door leaks noise or the walls are thin, you’ll need other tricks, like sealing gaps or adding a heavy curtain. This is why reflection points — the wall behind your mic and side walls — matter most.
How to Place Absorption Materials for Maximum Impact
Where you put your acoustic treatment can make or break your sound. Start by identifying the main reflection points: behind your mic, the side walls where sound bounces, and the ceiling above you. For more on effective placement, see this article about acoustic treatment placement. Use thick panels or blankets on these spots to absorb the harsh reflections. For example, if you record vocals at a desk, place a panel behind your head and a few on the side walls.
Don’t forget the floor — a rug or carpet helps reduce reflected sound from hard surfaces. In practice, I placed a thick moving blanket on the wall behind my mic and a bass trap in the corner, and my recordings instantly sounded cleaner. The key is strategic placement over random coverage.
Sealing Gaps & Blocking Sound Leaks in Your Closet
Sound escapes through gaps — under doors, around windows, and through tiny cracks. To keep outside noise out and your sound in, sealing these leaks is crucial. Weatherstripping the door and adding draft stoppers can reduce noise leaks significantly. For example, I used weatherstripping around my closet door, which cut outside noise by about 70%.
Sealing gaps isn’t just about noise. It also prevents sound from leaking into neighboring rooms, making your setup much more effective. Learn more about soundproofing techniques in this resource on acoustic dampening and sealing. Remember, a sealed closet is a quieter closet.
Why Ventilation & Heat Management Matter in a Closet Setup
Putting a noisy, high-power rig inside a closet sounds ideal for noise reduction — until it overheats. Trapped heat can turn your closet into a sauna, causing your machine to throttle and fans to scream. That’s why ventilation isn’t optional; it’s mandatory.
Simple solutions include passive vents or small exhaust fans that pull hot air out and bring in cooler air. For detailed ventilation strategies, check out this guide on heat management and airflow. More advanced setups use soundproofed ducting and thermostatically controlled fans, which keep the rig cool without adding noise. For example, I installed a quiet exhaust fan with ducting, and my system stayed cool even after hours of heavy use.
The 'Rig in the Closet' Setup — Pros, Cons, and Best Practices
Placing your rig in a closet is a game-changer for noise control. It isolates the sound, keeping your workspace silent. For more tips on building a quiet setup, see this site about home health and soundproofing. But it’s not foolproof. Without proper ventilation, heat builds up fast. Also, sealing gaps and managing reflection points remain critical.
Pro tip: Use a dedicated, ventilated cabinet or build a soundproof enclosure with active cooling. For example, a DIY closet booth with foam lining, vented ducting, and a small exhaust fan can keep everything cool and quiet. The key is balancing soundproofing with airflow.
How to Tackle Low-End Buildup & Standing Waves
Small closets often have bass problems — a boomy, muddy sound. This happens because of standing waves and parallel walls that amplify low frequencies. Find out how to fix this with this article on low-end treatment. To fix this, add bass traps in corners and treat the upper edges of walls. Thick, dense panels work better on low frequencies than thin foam.
For example, I placed a bass trap in each corner and used heavy blankets on the door. The result? Clearer vocals and a more balanced sound. Don’t ignore low-end — it’s the secret to a natural, professional tone.
Quick Tips for a Budget-Friendly Closet Studio
- Use thick moving blankets or quilts as door covers and wall treatments.
- Seal gaps with weatherstripping or acoustic sealant.
- Place a good rug or carpet to reduce floor reflections.
- Use a quiet exhaust fan for ventilation.
- Position your mic to avoid reflection points and unwanted noise sources.
Frequently Asked Questions
What is the main difference between acoustic dampening and soundproofing?
Acoustic dampening reduces reflections and echo within a room, making recordings clearer. Soundproofing blocks sound from escaping or entering, preventing noise leaks. They work together but serve different purposes.Where should I place foam or panels in my closet booth?
Start with reflection points: behind the mic, side walls where sound bounces, and the ceiling above you. Cover these areas with thick absorption material for best results.Do I need bass traps in a small closet?
Yes, especially if you notice a boomy or muddy sound. Bass traps in corners help control low-frequency buildup and give your recordings a more natural tone.Can a closet handle singing or only spoken voice?
A well-treated closet can handle singing, but low-end buildup and room size matter. Use bass traps and avoid overly reflective surfaces to improve sound quality for vocals.How much treatment do I need for a good recording?
Start with reflection points and a door seal. Add bass traps if low frequencies are muddy. Focus on sealing leaks and ventilating properly for the best balance of quiet and sound quality.Conclusion
Your closet can become a surprisingly effective studio booth — but only if you focus on where sound bounces, how to block leaks, and how to keep your equipment cool. It’s a balance of reflection treatment, sealing, and ventilation. When you manage these, even a tiny space can produce professional-grade sound.
Imagine a quiet corner with your rig humming softly in a ventilated, treated closet. That’s the power of smart placement and solid fundamentals. Your small space isn’t just a closet — it’s your secret weapon for clean, clear audio.