To boost hand dexterity with easy crafts, start by making DIY stress balls using balloons and flour, which helps improve squeezing and grip strength. You can also create colorful beaded jewelry or simple paper pinwheels, both enhancing fine motor control and coordination. Crafting paper chains or handprint art supports precision and creativity. Keep exploring different activities, and you’ll find more fun ways to strengthen your hands while enjoying simple projects.
Key Takeaways
- Practice simple stamping and pattern creation to improve hand control and coordination.
- Make DIY stress balls with balloons and flour to enhance squeezing and gripping skills.
- Create beaded jewelry and friendship bracelets to develop fine motor precision and hand-eye coordination.
- Fold and cut paper crafts like pinwheels and chains to strengthen manual dexterity and control.
- Use safe paints and stamps for detailed art projects that promote steady hand movements.

TXGSDXS DIY Stress Ball Making Kit 15 TPR Skins, 4.2 oz Fillers, 1 Vacuum Tool, 20 Cable Tie for Create ASMR Anxiety Relief Toys Crunchy Relaxing (15pcs)
DIY Stress Ball Making Kit: includes 15 ball skins, air pump, 15 zip ties 14.2 oz fillers beads…
As an affiliate, we earn on qualifying purchases.
As an affiliate, we earn on qualifying purchases.
Making DIY Stress Balls With Balloons and Flour

Creating DIY stress balls with balloons and flour is a simple and effective way to improve hand dexterity. Begin by inflating a balloon slightly, then measure out the right amount of flour. You want enough flour to give the stress ball a firm yet squeezable texture. Carefully pour the flour into the balloon, using a funnel or a rolled paper cone to prevent mess. Be sure to control the balloon’s inflation so it’s not too tight or loose. Once filled, twist the balloon’s opening and secure it with a knot. This method guarantees consistent flour measurement and a snug fit. The resulting stress ball is perfect for strengthening your grip and relieving stress, all while practicing precise balloon inflation and flour measurement. Additionally, choosing the right material quality ensures the durability and safety of your stress ball during use.

Pizooro Clay Beads 3 Boxes Bracelet Making Kit, 10500pcs Beads for Jewelry Making, Round Letter Beads with Charm and Elastic Strings, Friendship Bracelets Holiday Gifts for Girls Adults
All-in-one: Pizooro clay beads kits come with all the supplies and tools you need to get started, including…
As an affiliate, we earn on qualifying purchases.
As an affiliate, we earn on qualifying purchases.
Creating Colorful Beaded Bracelets and Necklaces

After mastering the art of making DIY stress balls, you can channel that creativity into crafting colorful beaded bracelets and necklaces. Start by exploring different beading patterns to create unique designs that suit your style. Choose beads in various colors and sizes to make your jewelry vibrant and eye-catching. Pay attention to bracelet sizing—measure your wrist accurately to ensure a comfortable fit, or use adjustable clasps for flexibility. Stringing beads onto elastic or wire is straightforward, but take your time to keep beads evenly spaced and secure. As you experiment with patterns and sizes, you’ll improve your hand dexterity while making beautiful accessories. Incorporating mindful relaxation techniques into your crafting routine can enhance your focus and enjoyment. This craft offers endless possibilities for personalization, making it perfect for both beginners and experienced jewelry enthusiasts.

Mocoosy 224 Sheets Origami Paper Kit for Kids Ages 5-8 8-12, Folding Paper Set with Origami Book for Beginners, Art Craft Supplies for Boys Girls 9-12, Travel Game Car Road Trip Activities Toy Gifts
Complete Origami Kit: Discover the art of folding paper with our colorful origami kit! With 144 double-sided origami…
As an affiliate, we earn on qualifying purchases.
As an affiliate, we earn on qualifying purchases.
Crafting Paper Pinwheels and Spinners
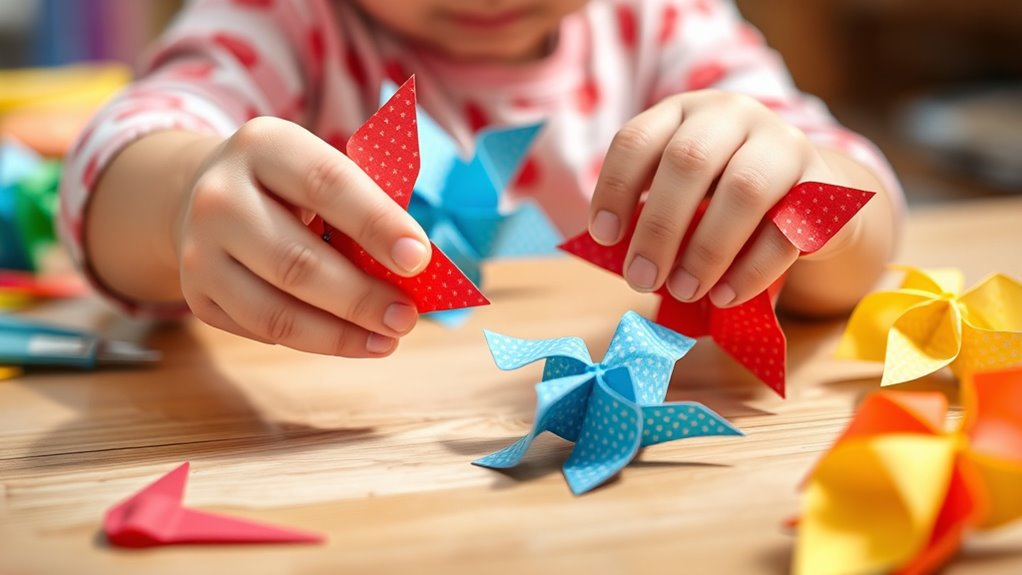
Crafting paper pinwheels and spinners is a fun way to develop your hand coordination and add a playful touch to any space. Start by practicing origami paper folding to create the central pinwheel shape; this sharpens your precision and control. Next, use decorative paper cutting to design colorful blades or patterns that enhance your spinner’s visual appeal. Carefully fold and cut the paper, making sure your edges are neat and accurate. Then, assemble the parts, attaching a pin or pinwheel stick to allow for spinning. As you work, you improve fine motor skills and gain confidence in handling paper. Additionally, understanding emotional support can help foster patience and encouragement during craft activities. These crafts are simple yet satisfying, offering a delightful way to boost your hand dexterity while creating charming decorative pieces.

7-Hole Wooden Therapy Pegboard Multifunctional Finger Dexterity Grip Strength Trainer for Fine Motor Skills Hand-Eye Coordination and Sensory Rehabilitation Ideal for Home Office Occupational Therapy
Solid Wood Construction & Ergonomic Design:Crafted from smooth-edged beech wood with stainless steel components and integrated storage. Specifically…
As an affiliate, we earn on qualifying purchases.
As an affiliate, we earn on qualifying purchases.
Assembling Simple Friendship Bracelets With Thread
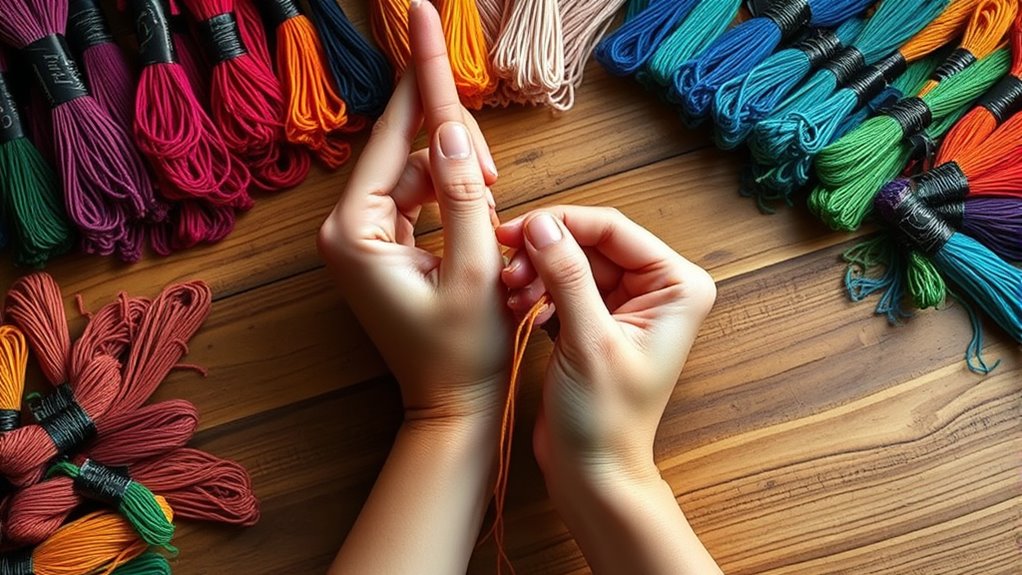
Start by selecting bright thread colors that catch your eye and match your style. Then, learn the basic knot techniques to keep your bracelet secure and neat. With these skills, you’ll be ready to create fun, personalized friendship bracelets quickly. Practicing crochet styles for locs can also help improve your hand dexterity for more intricate designs.
Subheading 1: Choosing Bright Thread Colors
Choosing bright thread colors is an exciting first step when assembling simple friendship bracelets. Vibrant hues can reflect seasonal themes, making your bracelets more personalized and fun. Pick colors that complement each other or match the mood you want to convey. Bright threads are also forgiving for beginners, helping to hide small mistakes. While you won’t need advanced sewing techniques for this craft, selecting the right colors sets the tone for your design. Consider combining contrasting shades for a bold look or soft pastels for a subtle effect. Remember, the key is to choose colors that inspire you and fit the occasion. With your bright threads in hand, you’re ready to create eye-catching, cheerful bracelets that showcase your creativity.
Subheading 2: Basic Knot Techniques
Mastering basic knot techniques is essential for assembling simple friendship bracelets with thread. These knot tying skills form the foundation for creating durable, attractive designs. Start with simple knots like the overhand or square knot, which are easy to learn and versatile. To improve your rope skills, practice consistently, focusing on tension and precision. Here’s a quick guide:
| Knot Type | Purpose | Tip |
|---|---|---|
| Overhand Knot | Secure ends | Keep tension steady |
| Square Knot | Join threads | Tighten evenly |
| Sliding Knot | Adjustable length | Practice sliding smoothly |
With these techniques, you’ll confidently craft beautiful bracelets while honing your hand dexterity. Paying attention to knot accuracy can significantly enhance the longevity and appearance of your bracelets.
Crafting Paper Chains for Decorations

Creating paper chains is a simple and enjoyable way to add colorful decorations to any space. You can start by choosing bright, sturdy paper or even recycled materials. To make your chains stronger, try incorporating origami paper folding techniques for neat, uniform links. You can also experiment with paper mache projects to create textured, decorative links. Here are some tips to get you started:
Create colorful, sturdy paper chains with simple folding techniques and recycled materials for vibrant decorations.
- Cut strips of paper evenly for consistent links.
- Link each strip by looping and securing with glue or tape.
- Vary colors and sizes for a festive look.
- Using origami techniques can help create more durable and intricate links.
With these ideas, your paper chains will look vibrant and professional, perfect for birthdays, holidays, or everyday cheer. Crafting these chains boosts hand dexterity while creating lively decorations.
Making Handprint Art and Stamps

When making handprint art and stamps, choosing the right type of paint is key; washable and non-toxic options work best. Try different stamping techniques, like pressing or dragging, to create unique designs. Don’t forget to preserve your handprints with clear sealants or frames so you can enjoy them for years. Using specialized spray tips can help you achieve smooth and detailed designs when applying paints for stamping.
Choosing Paint Types
Choosing the right paint type is essential for making handprint art and stamps that come out clear and vibrant. The paint should be easy to apply and suitable for color mixing without becoming too thick or runny. Selecting the right type guarantees smooth paint application and bright results. Here are key tips:
- Use non-toxic, washable acrylic paints for safety and easy cleanup.
- Opt for paints with good coverage to prevent multiple coats.
- Choose thicker paints for better color mixing and crisp stamp impressions.
Techniques for Stamping
To achieve clean and detailed handprint art and stamps, applying the right stamping techniques is essential. Start by using ink pad techniques to get consistent ink coverage. Press firmly and evenly to avoid smudges. Experiment with stamping patterns—like concentric circles or repeating shapes—to create interesting designs. Use different ink pad colors for variety. For precise results, lift the stamp straight up without twisting. Practice on scrap paper first to perfect your technique. Remember, a steady hand and even pressure make all the difference. Here’s a quick guide to stamping techniques:
| Technique | Best Use | Tips |
|---|---|---|
| Ink pad application | Even coverage for clarity | Tap gently to avoid excess |
| Stamping patterns | Repeating designs | Use a stamp pad for consistency |
| Layering colors | Multi-colored effects | Let ink dry between layers |
| Clean stamping | Reuse stamps effectively | Use a damp cloth |
| Precise placement | Symmetrical patterns | Mark placement beforehand |
Preserving Handprints
Once you’ve mastered stamping techniques to create detailed handprint art, preserving those prints becomes the next exciting step. You can do this through fingerprint preservation or by creating a beautiful handprint framing that captures your child’s growth. To make the most of this process, consider these key tips:
- Use non-toxic, washable paints for easy cleanup and safety.
- Carefully press your child’s hand onto paper or canvas, then let it dry thoroughly.
- Once dry, you can enhance your art by adding details or framing it for display.
- Incorporating handprint art into your home decor can also serve as a heartfelt reminder of childhood milestones.
Preserving handprints creates lasting memories and makes charming keepsakes. Whether you choose fingerprint preservation for tiny prints or handprint framing for larger pieces, these crafts keep your child’s growth beautifully documented and ready to cherish forever.
Frequently Asked Questions
What Are Some Safety Tips for Young Children During Craft Activities?
To keep your child safe during craft activities, always supervise them closely and follow child proofing tips. Keep small items that pose choking hazards out of reach, and use non-toxic, washable supplies. Teach your child about safe tool use, like scissors, and stay nearby to monitor their actions. By supervising actively and child proofing your space, you can guarantee a fun, safe craft experience for your little one.
How Can I Adapt Crafts for Children With Limited Hand Mobility?
A stitch in time saves nine, and adapting crafts can make all the difference. You can modify activities with adaptive techniques like larger, easy-to-grip tools and use assistive devices that suit their needs. Break tasks into smaller steps, choose simpler materials, and allow extra time. These strategies empower children with limited hand mobility to enjoy crafts, fostering creativity and confidence while ensuring safety and accessibility.
What Supplies Are Essential for Starting Basic Hand Dexterity Crafts?
You’ll want to gather some craft supply essentials like safety scissors, textured materials, and glue for starting basic hand dexterity crafts. Beginner craft tools such as foam shapes, pom-poms, and large-tipped markers make activities easier and more accessible. These supplies help improve grip, coordination, and fine motor skills while keeping the process fun. Keep the tools simple and suited to the child’s ability level for the best experience.
How Do I Motivate Children to Practice Hand Coordination Through Crafts?
You can motivate children to practice hand coordination by making crafts fun with engaging hand exercises like pinching, squeezing, or threading. Incorporate creative reward systems, such as stickers or praise, to celebrate their progress. Keep activities playful, offer choices, and show enthusiasm. This approach encourages kids to enjoy developing their fine motor skills, making practice feel less like a chore and more like a fun, rewarding experience.
Are There Eco-Friendly or Recycled Materials Suitable for These Crafts?
Think of Mother Earth as your guiding muse. You can use recycled paper for your crafts, turning old pages into new masterpieces. Pair it with eco-friendly glue to keep everything sustainable and safe. These materials are perfect for fostering creativity while respecting the environment. By choosing recycled and eco-friendly options, you teach children the importance of caring for the planet through hands-on, meaningful activities.
Conclusion
Engaging in these simple crafts not only boosts your hand dexterity but also sparks your creativity. Did you know that activities like crafting can improve fine motor skills by up to 20%? So, grab some supplies and start creating—whether it’s a colorful bracelet or a paper chain. You’ll enjoy the fun and benefit from better hand control in no time. Happy crafting!