TL;DR

Turn quiet afternoons into listening time
- Thousands of audiobooks, podcasts and originals
- Listen on your phone, tablet or Echo — also offline
- Cancel anytime
Easy-to-use electric can openers let a motor do the cutting, but you may still need to position the can and remove the lid. Compare the alignment, controls, cutting style, can compatibility, and cleaning instructions before choosing one; no single design is easiest for everyone.
A can opener can turn a quick dinner into a small wrestling match: the can slips, the handle bites into your palm, and the lid bends before it comes free. An electric can opener moves the cutting work to a motor, which can make opening cans easier when you have limited grip strength or wrist movement.
But “electric” does not automatically mean effortless. You still may need to line up the can, press a control, and lift the lid away. This guide explains what to look for in easy-to-use electric can openers, how cutting styles differ, and how to check whether a model fits your cans and your kitchen. The goal is simple: make the next can of tomatoes a routine kitchen task, not a test of hand strength.
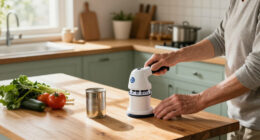
The motor handles the cutting, but you may still need to align the can and remove the lid.
Traditional openers cut inside the rim; side-cut models aim to leave a smoother lid edge, which still needs careful handling.
Before buying, check can compatibility, controls, stopping behavior, cleaning directions, and the appliance’s footprint or battery needs.
Choose countertop, cordless, or handheld based on where you work and how much guidance the model requires.
Unplug countertop models before cleaning and follow the manufacturer’s directions for the cutter assembly.
What Makes an Electric Can Opener Easier on Your Hands?
Easy-to-use electric can openers rely on a motor to turn the cutter, reducing the hand strength and repeated wrist movement you need for cutting. That can matter when turning a manual opener causes discomfort or fatigue, but the motor only changes one part of the job. The can still has to meet the cutter at the right angle, and the finished can and lid still have to be removed.
This shifts the task’s demands rather than removing them. A person who finds twisting difficult may welcome the motor, while someone who struggles with small, precise movements may find alignment or lid removal is still the hardest part. The useful question is not simply whether the opener is powered, but which steps it makes easier for you and which steps remain.
The setup can shift effort from turning to positioning and lifting. A stable base and a head that holds the can in place may help if your hands tire while keeping a can steady. A large lever may be easier to press than a small control, while a model that needs careful alignment could be frustrating if fine finger movements are difficult. These features work together: a comfortable button does little good if the can repeatedly slips before cutting.
Consider the whole sequence in your own kitchen. Some models stop automatically, so you do not have to keep a lever pressed throughout the cut; others require you to release it yourself. Then you may need to lift the can away and separate the lid. If lifting a full can is difficult, a design that makes release straightforward may matter as much as how the motor starts. A smaller can may be easier to handle, but the best choice depends on the foods and portions you actually use.
Ease of use depends on the whole sequence: placing the can, starting the cut, releasing it, and handling the lid.
If arthritis or another health condition affects your hands, this article offers general shopping information, not medical advice. A qualified occupational therapist or other health professional can help you think through kitchen tools for your particular needs.
Products Worth Considering

Withings BPM Connect Wi-Fi and Bluetooth Blood Pressure Monitor

Garmin Forerunner 570 GPS Running Smartwatch, 42 mm, Raspberry, with P-Bank Bundle

Oura Ring 5 Smart Ring, Gold, Size 10
As an affiliate, we earn on qualifying purchases.
Compare Smooth-Edge and Traditional Cuts Before You Buy
Easy-to-use electric can openers usually cut cans in one of two ways: traditional models cut inside the rim, while side-cut models cut along the can’s side and are intended to leave a smoother edge. This difference affects what happens after the motor stops. With a traditional cut, the lid may sit within the rim; with a side cut, it may lift away differently. Either way, you still need to work out how the lid releases and where to hold it.
A smoother edge can make lid handling feel less risky, but it does not make the lid something to grab without care. A thin metal edge can still be sharp, and a loose lid can be awkward to lift, especially if the can is wet or the lid is covered with food. Imagine opening a can of peaches over the counter: choosing a side-cut design may reduce the sharpness you encounter, but using a utensil or following the maker’s removal instructions can still help keep fingers clear.
The cutting style also changes what you should pay attention to during a demonstration. With a traditional opener, notice whether the lid stays in place or drops into the food. With a side-cut model, see how the lid detaches and whether you can remove it without touching the edge. Those details affect cleanup as well as handling: a lid that contacts the food or collects residue may require care when you set it aside.
| Feature | Traditional cut | Side cut |
|---|---|---|
| Where it cuts | Inside the rim | Along the side |
| Lid edge | Often sharp | Intended to be smoother |
| What to check | How the lid is removed | How the lid is released and handled |
The table describes general designs, not a promise about every product. Read the manufacturer’s description and instructions, and keep fingers away from the cutting area. If you compare two electric can openers in a store or demonstration, watch the whole process from first contact to lid removal; the way a model releases the lid may matter more to you than the label on its cutting style.
Check These Six Details to Find a Better Fit
Easy-to-use electric can openers are easier to compare when you test the details that shape everyday handling: can alignment, controls, compatibility, stopping behavior, cleaning, and storage. These details affect different kinds of effort. A can that is difficult to align can mean repeated starts, while a cutter that is awkward to clean may make an appliance less appealing to use regularly. A product photo may show a sleek appliance, but it cannot tell you whether its lever is comfortable or whether it handles the tall can of broth you use every week.
Use this short checklist while reading product specifications or watching a demonstration. For instance, if your cupboard holds large cans of tomatoes, confirm that the model accepts their height before you buy; a motor cannot make up for a can that does not fit under its cutting head. Think about frequency too: a feature that saves a little effort each day may matter more than an extra function you use only occasionally.
- Try the placement: Look for a stable base and a cutting head you can align without repeated adjustments. Stability matters because a shifting can can interrupt the cut and require you to reposition it. If you must hold both the appliance and can steady, consider whether that setup is comfortable for your hands.
- Check the controls: A large, easy-to-press lever or button may be more manageable than a small switch. Consider whether you can reach and release it comfortably, not just press it once. A control that stays engaged during cutting may reduce sustained pressure, but it should still be easy to stop if the can slips.
- Confirm can sizes: Check the maker’s stated compatibility, including tall or unusually shaped cans you use. A model that handles your usual cans is more useful than one with features you rarely need. If a can is outside the stated range, forcing it can lead to poor alignment or an incomplete cut.
- Find out how it stops: Some models stop automatically; others require you to lift the lever. Automatic stopping can reduce how long you need to hold a control, but you will still need to remove the can and lid. Check whether stopping also leaves the can easy to release, since that next step may require grip or lifting.
- Read the cleaning directions: See whether the cutter assembly detaches or should only be wiped. A removable assembly may make residue easier to reach, but it also adds a part you must handle and reinstall correctly. A wipe-only design can mean fewer parts to manage, though access around the cutter may take more care.
- Measure your space: Compare the footprint, cord length, or battery needs with your kitchen setup. A countertop model can be ready to use but occupy permanent space; a compact model saves room but may need to be fetched, charged, or guided by hand. The convenient option is the one you can reach and set up without creating another awkward step.
These checks also help you compare models without getting distracted by a built-in knife sharpener or bottle opener. Those extras might be handy, but a bulky appliance can be harder to store and may add parts to clean. A plain model that fits your hands and cans can be the better choice.
Choose Countertop, Cordless, or Handheld for Your Kitchen
Easy-to-use electric can openers come in countertop, battery-powered, and compact handheld styles, and each makes a different tradeoff between stability, portability, and setup. A countertop model generally works from a fixed spot, while a cordless one can be stored in a drawer or carried to another room. The right choice depends on where you open cans and how much positioning you are comfortable doing.
Picture making soup in a small kitchen: a countertop opener with a wide base may be convenient if it can stay beside the kettle. Its fixed position can reduce the need to hold the appliance while it cuts, but the counter space it occupies is part of the cost of that convenience. In a shared kitchen with little counter space, a battery-powered model may fit better in a drawer. You gain storage flexibility, but need to keep batteries charged or replace them, and some models require more direct guidance around the can.
Compact handheld electric models can take up less space, though less counter support may mean more hand guidance. Their convenience depends on the design and your dexterity. Check how the device grips the can and whether you can comfortably control its path; do not assume a smaller appliance needs less effort. If keeping the can steady is already difficult, a lightweight device may still require more coordination than a stable countertop model.
These tradeoffs become clearer when you consider how often and where you open cans. If you open several cans at once, a stable model left in place may save repeated setup and hand guidance. If you open one can occasionally and have limited counter space, a stored cordless model may be easier overall, provided fetching it and maintaining its batteries are manageable. If you work away from outlets, portability matters more; if you have a convenient outlet and a permanent spot, a cord may be a minor inconvenience.
One feature cannot settle the choice on its own. If possible, watch a full demonstration that includes starting, cutting, and removing the can. Compare those steps with your kitchen habits: opening one can beside a stove is different from opening several cans at a table with no outlet nearby. Think about whether saving counter space is worth the extra setup, or whether having the opener ready in one place makes regular use easier.
Clean the Cutter Safely and Troubleshoot Slips
Clean an electric can opener according to its manufacturer’s instructions, and unplug a countertop model before wiping or removing any parts. Food residue can gather around the cutting assembly, but the blade area is not a place for bare fingers. Some cutters detach for washing; others should only be cleaned with a careful wipe. The difference matters because washing a part that is not designed to get wet can damage the appliance, while leaving food residue may make later cleaning harder.
Say you have just opened a can of tomato paste and see a red smear near the cutter. First unplug the appliance, then check the manual to see whether that assembly can come off. If it cannot, use the cleaning method the maker recommends and keep your fingers clear of the cutting edge. Do not put an appliance part in water unless the instructions say it is safe. Let parts dry as directed before reassembling or plugging the opener back in.
If the opener slips or stops before it finishes, start with the straightforward checks: is the can aligned correctly, is its shape supported by the model, and is the cutter clean? A cordless model may also need fresh or charged batteries. For example, a tall can that tilts away from the head may not be a problem with the motor at all; it may simply fall outside the opener’s stated capacity. Repeatedly restarting without correcting the cause can make the can harder to handle and the cut less predictable.
Do not force a jammed can through the cutter. Stop and follow the model’s troubleshooting directions. Keeping the appliance dry and clean, and following its care instructions, can help maintain performance, though lifespan varies with construction and how often you use it.
Get More Value From Simple Controls and Safety Features
Easy-to-use electric can openers work best when their controls and feedback match what you can comfortably see and feel. A large lever may be easier to press than a small button; an indicator light or audible signal may help you tell when the opener is running. These features vary by model, so check the actual specifications instead of assuming every appliance has them. Feedback is especially useful if the motor is quiet or the control is not visible from your usual working position.
Automatic shutoff can save you from holding a lever throughout the cut on models that include it. But automatic stopping does not remove the need to release the can or handle its lid. If you are choosing an opener for someone else, watch how they manage the entire task. For instance, a person might find the press easy but need a steadier grip to lift a can of soup away from the base. That observation can help identify whether a different release mechanism or a lighter can would make the whole task more manageable.
Some designs hold the can in place while cutting, which may make the process feel steadier. Other models need more precise alignment at the start. That is why a short product demonstration can tell you more than a feature list: look for a clear view of how the can is positioned and released. Pay attention to whether the user has to keep a hand near the cutting area, since a stable setup can affect both comfort and confidence.
Keep fingers away from the cutting area, even when the opener has a side-cut design. A lid that looks smooth can still cut you. Follow the instructions for your specific appliance, and ask a qualified professional for advice about tools if a health condition makes kitchen tasks difficult.
Frequently Asked Questions
Are electric can openers easier to use than manual ones?
Often, because the motor does the cutting and reduces the repeated turning motion. You may still need to position the can, press a control, and remove the lid, so check those steps too.
Which electric can opener is easiest for arthritis or weak hands?
There is no single design that works best for everyone. Look for a stable base, simple alignment, and a control you can press comfortably; if possible, watch a demonstration of the full process or try the opener. A qualified health professional can offer guidance for your specific needs.
Do smooth-edge electric can openers leave lids completely safe?
No. Side-cut models are intended to leave a smoother edge than traditional openers, but the lid may still have sharp edges. Keep your fingers clear and follow the product instructions when removing it.
Can an electric opener open any can?
No. Compatibility depends on the model, and unusually shaped, very small, oversized, or rimless cans may not work. Check the manufacturer’s listed can sizes and shapes before buying.
How should I clean an electric can opener?
Follow the instructions for your specific model and unplug a countertop opener first. Some cutter assemblies detach for washing, while others should only be wiped clean. Keep your fingers away from the blade area.
Why does my electric can opener stop or fail to cut?
Common reasons include poor alignment, a can shape the opener cannot handle, residue or wear around the cutter, or low battery power. Stop if the can jams and use the manufacturer’s troubleshooting directions rather than forcing it.
Conclusion
Choose an opener by watching the full task: how you place the can, start the cut, release it, and clean the cutter afterward. Check its supported can sizes and cutting style, then weigh its controls and storage needs against the way you actually use your kitchen.
A motor can take the strain out of turning, but a good fit makes the whole job feel calmer. The next can should open with a quiet press, not a battle at the counter.